
Introducing the PassivHaus Principles
Among all the technical module lectures that we had in our undergraduate degree, we had never been introduced to the term, PassivHaus, more commonly known as Passive House principles. Although generally we are not introduced to the technicalities of building regulations during our Part 1 qualification, we could see how helpful it may have been had we known about the methods by which we could tackle the climate crisis besides the ol’ solar panel on the roof.
So, after 7 months of being in practice, here is an introduction to Passive House and the ways in which it intends on providing energy-efficient buildings. Even coming close to the Passive House standards here in the U.K. goes beyond the exemplar targets set by the RIBA 2030 Climate Challenge. Meaning… keep your ears peeled :)
Country by country there are different efforts being made in order to reach a level of net-zero emissions, carbon-neutral and some even to the extent of carbon-negative standards. Companies can do this through strategic methods of fabrication, construction, materiality choice and/or taking advantage of ever-progressing technology.
One standard or set of rules and regulations you may not be familiar with is the Passivhaus (Passive House) Principles developed in Germany. Considering the rise of energy bills in the past 3 years, it’s become all the more necessary to be more conscious about saving energy in the context of architecture & construction. We’ll be breaking down the 5 principles behind hitting the PassivHaus targets.
High Quality Insulation:
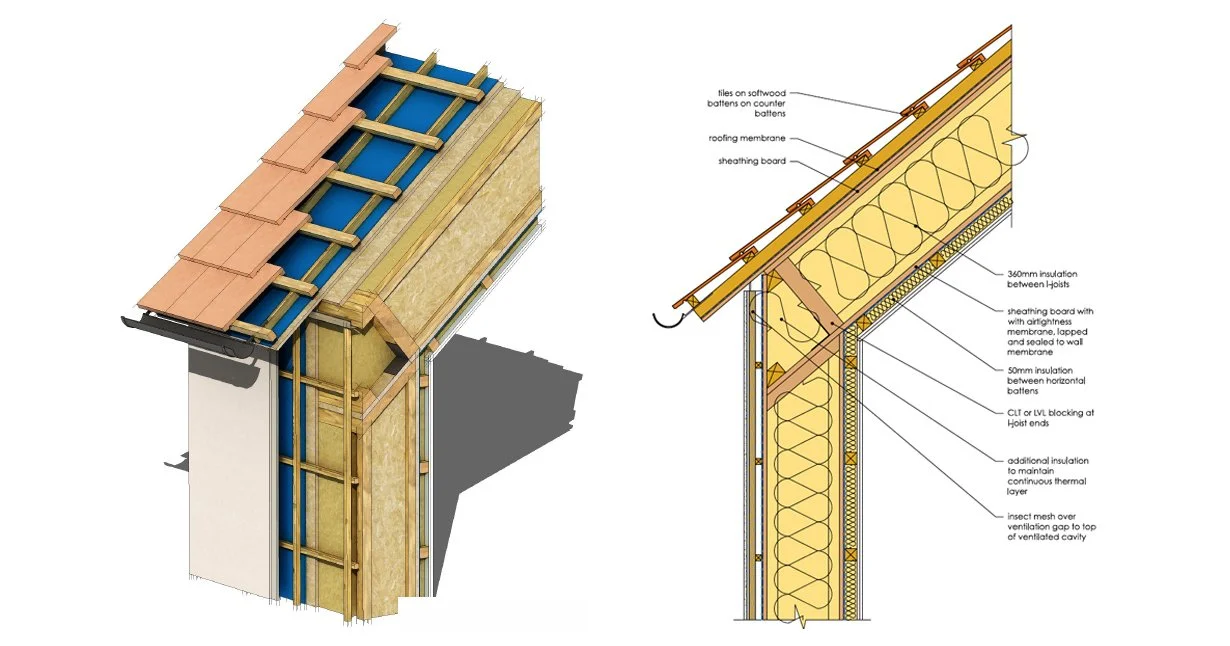
The first approach is to ensure that the specified insulation for the project is of high quality and is being used strategically. The aim is to minimise overheating the building in warmer months and ensure minimal heat loss in the colder months.
If in warmer months the insulation does not perform well enough, heat within the home will not be able to sustain a consistently comfortable temperature and instead lead to fluctuation. You wouldn’t want to have to turn your heating on in the middle of August because your home is not able to dissipate the heat gained during the daytime overnight. Additionally, you need to look out for where insulation is placed. The easiest way of understanding this concept is to imagine an insulation layer which wraps around the building like a blanket. There should be a consistent line of insulation that is undisturbed going around the house. Now obviously things like pipework and other exterior connections coming into the house will inevitably puncture through the insulation layer. In scenarios like this, these connections have to be insulated individually and zero leaks or pockets between the external and internal envelope need to be ensured to avoid air transfer. A popular way of attempting to eliminate air transfer through tiny cracks and small gaps is using tape. Not your ol’ masking tape obviously but there are types of tape specifically designed to preserve the airtightness boundary.
What some people may think is why we can’t use insulation foam to cover up these cracks but due to the less dense and less compact nature, you won’t be able to guarantee the control of unwanted air transfer in the building’s envelope. Thus, the tape is used to preserve airtightness, Tescon Vana is a very commonly used manufacturer used among contractors.
Airtightness
I’ve thrown this term about in the previous principle but some of you may not be familiar with it. An airtight building limits the heat transfer in and out of the building through draughts or leaks.
Usually, soon after the construction phase has begun, before a contractor removes all the windows, external doors and roof, it’s good practice to book in an airtightness test to see what you’re working with. In other words, let’s see how draughty the building is. How much air is escaping the building? Here is a link to a video showing you how the test is done.
This test is actually quite fun and I was personally able to take part in the manual testing for draughts. We went around each existing door and window and held out our hands to feel for any air entering the home. We did this once the house had been depressurised using the fan method shown in the video. Photographs of the leaky areas were taken and recorded. Usually, you are looking out for these leaks around windows, doors, drainage pipes and any other features that would be puncturing through the envelope of the building.
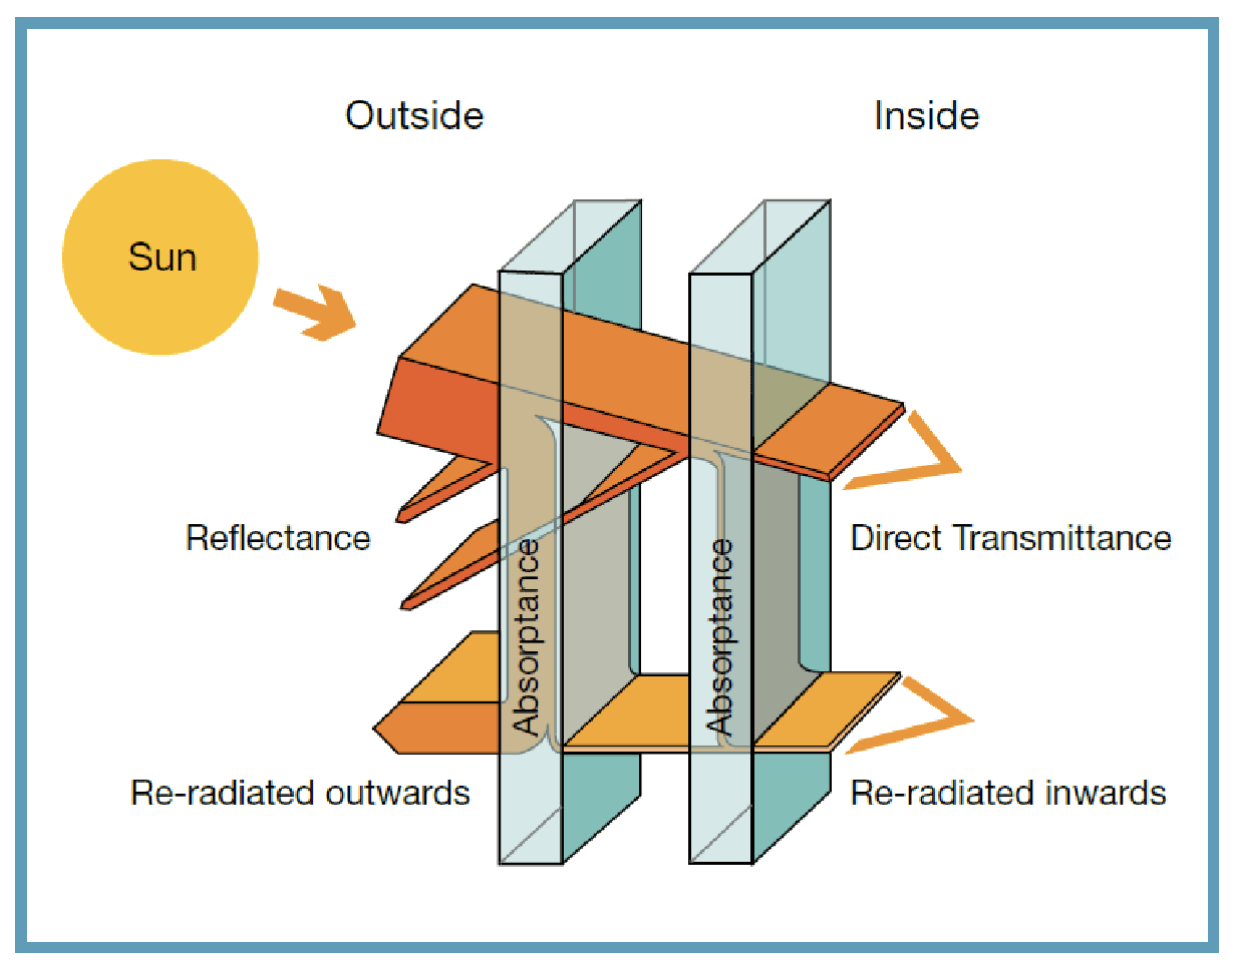
Glazing
This point comes without question and it’s to step up your glazing to double or even better triple. The aim here is to not only continue the thermal envelope or what we just learnt as the airtightness layer throughout the whole ‘outline’ of the building, but also to help the building make use of heat trying to enter the home as well as maintaining it inside without overheating. To avoid the overheating situation, technology has developed further to provide what is called ‘solar control glazing’. This type of glazing is smart in circumstances where a building is exposed to a lot of sun for long periods. Although you could opt for blinds or shutters, it’s better to incorporate technology into the architectural features rather than going through the hassle of depending on secondary solutions.
The diagram below shows how solar glazing helps with sustaining a comfortable living temperature within the building.
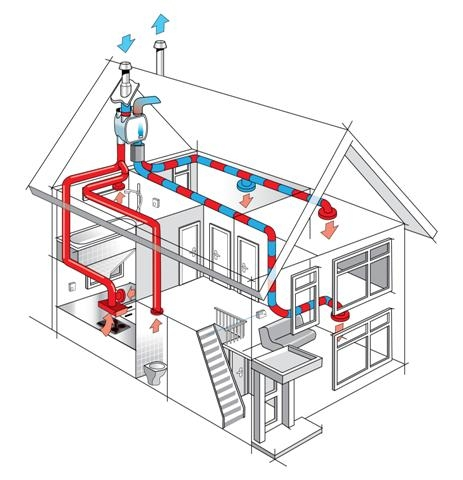
A Ventilation Strategy
The most common ventilation strategy that I have come across in my past couple of months in the workplace is a mechanical ventilation heat recovery system (MVHR). The intention behind a good ventilation strategy is to not resort back to opening windows or doors in order to regulate temperature or provide fresh air into a space. The reason behind this is so the heated air from radiators is preserved and thus not being wasted.
What an MVHR system ensures is the replacement of internal stale air with heated fresh air through an MVHR unit and ducting that runs within the building. It can also help with sustaining a good environment to avoid moisture build up meaning no mould. The unit works on a supply and extract system. Usually bathrooms will have double extract in order to lessen the chances mould building up as these are wet rooms. Living spaces like a living room and bedrooms will have air supplied into the room instead of opening windows.
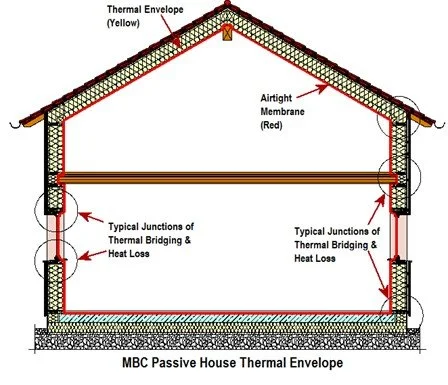
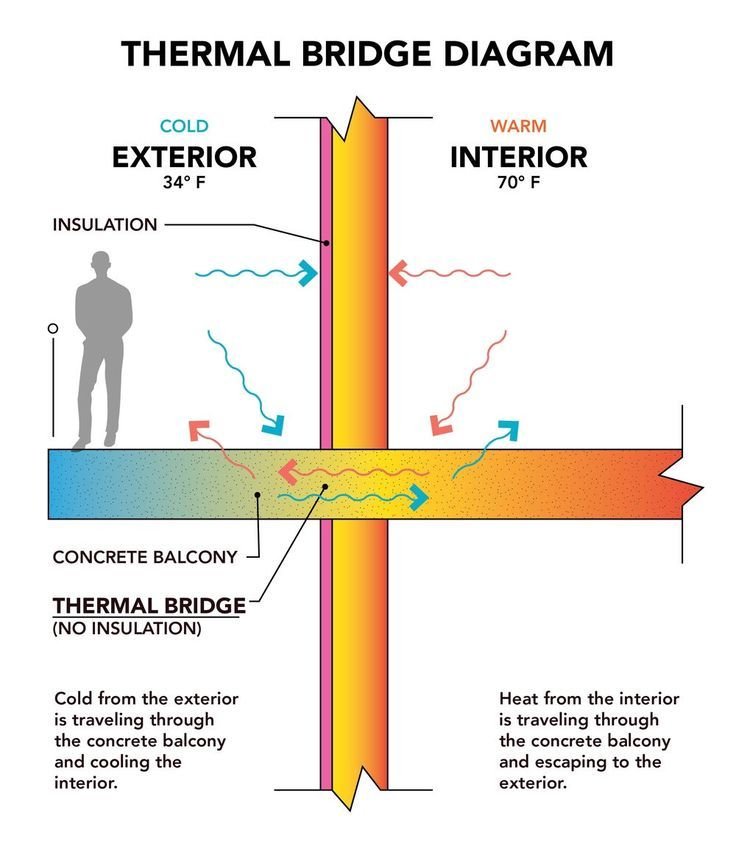
Limiting Thermal Bridges
Thermal bridging occurs at the main junctions within a building: Wall/floor junctions, wall/roof junction, wall/window junctions and floor/door junctions. Essentially it is when two architectural features meet. “How do you tackle continuing the thermal envelope in these scenarios”, you may ask.
The reason why thermal bridging may happen is because of a well insulated wall and floor junction not allowing for the escape of air. What will happen is naturally the air will travel towards junction points where the insulation envelope is the weakest. As a result heat is lost through the fabric of the building, yet again. A way of solving the transfer of heat to the outside, is through the use of a thermal block. Which, like it’s name, blocks the travel of heat through the junction.
That’s it for this week’s post guys!
We hope this has been a great addition to all of the technical data you may have learnt along the way during your studies.
If you have any questions or ideas to share with us, feel free to get in touch with us through our email at . Don’t forget to follow our Instagram page @archidabble, where you can comment on our posts on any tips you want to share, or DM us with any questions you have. We also post weekly Instagram content on Mondays and Wednesdays which you can follow up on and stay tuned for.